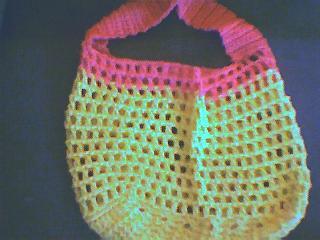
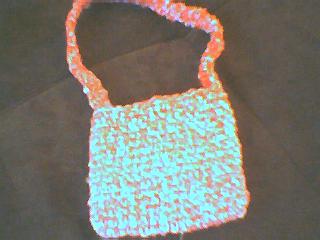
I made this while trying to think up a cute lollipop cover to give out for Christmas... It turned into a cell phone case, which naturally made me think "Must make MATCHING PURSE!!" And so another monster was born. I used Red Heart Super Saver in Bright Pink, and Wintuk? in Oatmeal, which i think is like super discontinued?? not sure... But anyways I used an aluminum hook size G (US). This project is really cool to me because I could make 2 sets with reversed colors... but I had less than half a skein of either of these colors :P
colors are MC (main color) and CC (contrasting color)
Purse:
With MC, ch 29
1) sc in 2nd ch from hook and in each st across, ch1, turn. (28 sc)
2) sc in each sc across, ch1, turn. (28 sc)
3) sc in each sc across, putting 3 sc in last st. Turn piece on side and put 1 sc in between Rows 1 and 2. Turn piece around and work free loops on opposite side. 3 sc in first st,1 sc across, with 1 sc in between Rows 1 and 2 on other side, and 2 sc in last st. Join with sl st to top of 1st sc.
4) work in bl only. ch1, do not turn. sc in same st as joining and in each around. Join with sl st to top of 1st sc.
5) Repeat Round 4.
6) ch2, hdc in same st as joining and in each around. Join with sl st to top of first hdc (not ch2).
7)Repeat Round 6.
8-9) Repeat Round 4.
10-11) Repeat Round 6.
12-13) Repeat Round 4.
14-15) Repeat Round 6.
16) change to CC, making sure to join yarn at same place as joining on previous Round. Repeat Round 4.
17) Repeat Round 4.
18-19) Repeat Round 6.
20-21) Repeat Round 4.
22) change to MC, joining yarn 4 stitches before place of joining on previous Round. Reapeat Round 6.
Strap:
23) ch2, hdc in same st as joining and in each of next 17 sts. ch 30 (this will become the strap) skip next 15 sts. hdc in next st and in each of next 17 sts. join with sl st to top of first hdc.
24) sl st in bl only of next 4 sts, ch1, sc in same space as last sl st. sc in next 12 sts. make sc decrease over next 2 sts. sc in each of next 29 sts, make sc decrease over next 2 sts. sc in each of next 15 sts, make sc decrease over next 2 sts. sc in each of next 28 sts, make sc decrease over next 2 sts. sc over sl sts made in beginning of round, join with sl st to top of 1st sc.
25) ch1, working in bl only, sc in same st as joining and in each of next 12 sc. make sc decrease over next 2 sts. sc in each of next 28 sts, make sc decrease over next 2 sts. sc in each of next 14 sts, make sc decrease over next 2 sts. sc in each of next 27 sts, make sc decrease over next 2 sts. sc in last 2 sts, join with sl st to top of 1st sc.
26) ch2, hdc in same st as joining and in each sc around, making hdc decreases over 2 sts at beginnings and ends of straps. joing with sl st to top of 1st hdc. Fasten off, weave in ends.
Cell Phone Case:
With MC, ch 9
1) sc in 2nd ch from hook and in each st across(8sc). ch1, turn.
2) sc in same st as ch1 and in each across(8sc). ch1, turn.
3) 3 sc in same st as ch1. sc in each st across to last sc, 3 sc in last. Turn piece and work 1 sc in the side, in between Rows 1 and 2. Turn. You will now work on the underside of Row 1, in the free loops. 3 sc in 1st st, 1 sc across to last st. Turn and work 1 sc in the side, in between Rows 1 and 2. Join with sl st to top of 1st sc (not ch1). (26 sc around)
4) Working in bl only, ch1, do not turn. sc in same st as joining and in each around. Join with sl st to top of 1st sc (not ch1). (26 sc)
5) Repeat Round 4. ch2, do not turn.
6) hdc (thru both loops) in same st as joining and in each around. Join with sl st to top of 1st hdc (not ch2). (26 hdc)
7) Repeat Round 6.
8-9) Repeat Round 4.
10-11) Repeat Round 6.
12-13) Repeat Round 4.
Strap:
1) ch1, do not turn. sc (thru both loops) in same sp as joining and in next 4 sts.
2) ch1, turn, sc in each of the 5 sts of previous Row.
3-22) Repeat Row 2.
Making Buttonhole:
23) ch1, turn, sc in same st and next after it. ch2, sk 1 st, sc in each of next 2 sts. (6 sts)
24) ch1, turn. make sc decrease over same st as ch1 and next after it. 2 sc in ch2 sp and in each of next 2 sts. (5 sts)
25) ch1, turn. make sc decrease over same st as ch1 and next after it. sc in each of next 3 sts. (4 sts)
26) ch1, turn. make sc decrease over same st as ch1 and next after it. sc in each of next 2 sts. (3 sts)
27) ch1, turn. make sc decrease over same st as ch1 and in next after it. sc in next st. (2 sts)
28) ch1, turn. make sc decrease over the 2 sts in Row. secure this stitch with a sl st so it doesnt fall apart. cut yarn and weave in ends.
Now you can either sew a ready made button onto the side of the cell phone case, or make your own with crochet, like i did :D
To Make Button: ch2, 8 sc in 2nd ch from hook, join with sl st to top of 1st sc.
ch1, do not turn. 2 sc in each st around. join with sl st to top of 1st sc. Fasten off yarn, leaving a long tail, this is why:
weave the tail in and out between the stitches in the 2nd Round of button. then bring thru the whole in the center and pull really tight so the little circle becomes a ball. sew little ball button to the side of cell phone case.
Optional: make a little applique in CC (mine was a heart.. derr...) and sew it to the front.
sorry guys, here come the neccessary rules...
THIS IS MY ORIGINAL PATTERN. YOU MAY USE THIS PATTERN FOR YOUR OWN PERSONAL USE. DO NOT POST ON ANY OTHER WEBSITES, PLEASE LINK BACK HERE IF YOU WANT TO SHARE WITH OTHERS ONLINE. YOU MAY NOT SELL THIS PATTERN, BUT FEEL FREE TO SELL THE FINISHED PRODUCT IF YOU WISH.
Mari <3